Coseppi Kitchen

Inclusive Vegetarian Cooking by Taylor Cook & James Seppi

Tips and Techniques


Preserving Hot Peppers

Fresh hot peppers are abundant this time of year and it is easy to take them for granted. But, come this winter, you will be glad if you take the time now to preserve your piquant summer bounty.  Here are a few of our favorite ways to make sure we have hot peppers all year long:

Fermenting Peppers for Hot Sauce

Fermenting Peppers for Hot Sauce

  • Dried Pepper Flakes – This is my favorite way to preserve hot peppers with thin flesh like hinkelhatz, cayennes, scotch bonnets, and habaneros. Dehydrate whole, clean, fresh  peppers in a dehydrator until they are dry and brittle, about 12 hours. If you don’t have a dehydrator you can also dry peppers in a warm (150 degree) oven or outside, but these methods may take considerably longer. Dried peppers are more comfortable to handle then fresh peppers – once they are dry you can easily remove the stems and shake out the seeds if desired. Transfer the dried peppers to a food processor and pulse until the peppers are in the desired size flakes. Let the flakes and any dust settled in the food processor then transfer to an airtight container and keep for up to a year. 
  • Smoked Peppers – I get really excited when I hear that a friend is smoking a brisket, not because I have ever even had brisket but because it is a good chance to smoke salt (yummy) and peppers. Choose hot peppers with thicker flesh that can soak up the most flavor. Homemade smoked jalapenos (also known as chipotles) will make you think twice about their canned cousins and smoked poblanos are fantastic in cold weather chili. Serranos are also a good option. If your smoked chilies are not fully desiccated store them in the refrigerator in an airtight container for up to a year.
  • Pickled Peppers – I love pepper relish and sweet pickled hot peppers. We have a good pickled jalapeno recipe, which would also work well padróns  or any pepper with a medium-high heat. Canned pickled peppers will last forever and should be refrigerated when opened.
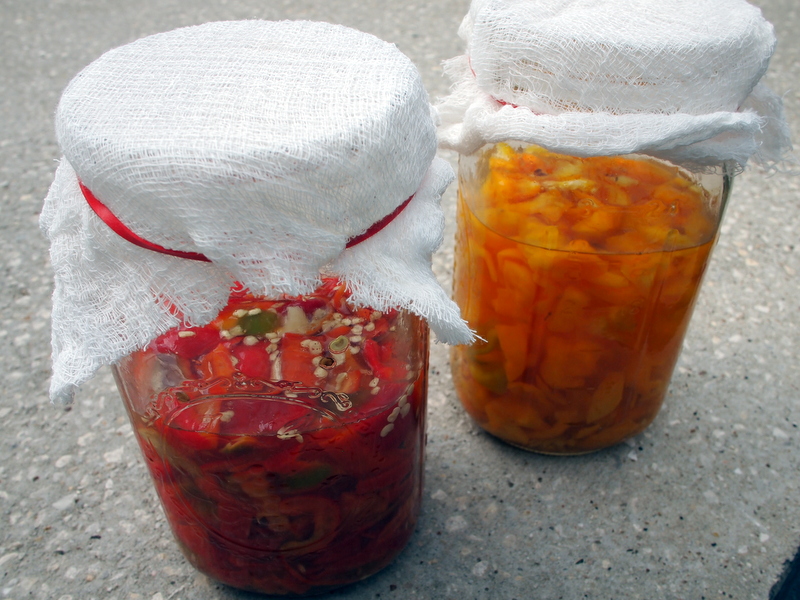
  • Salt Brine Fermenting – This summer we are making fermented hot sauce with padrón peppers and habaneros using a recipe from the Joy of Cooking. They are brined in a salted sweet wine and left open to the air for several days to ferment. The fermented peppers are then ground, vinegar is added, then it is bottled. This hot sauce can last in the refrigerator indefinitely (think about the bottle of Tabasco that always seems to be in the back of the fridge when you need it).

Crushed Ice

Crushed ice is necessary for preparing and serving many cocktails and there are a number of different ways to get the job done. The texture of the ice and its melt rate will vary, so we encourage you to experiment with some of these methods to find the one that matches your tastes:

  • Lewis Ice Bag – Once upon a time making ice required breaking down large blocks that were delivered to your establishment in a horse drawn cart. Getting these large blocks down to a size and shape that would fit into a glass required an ice pick, a sturdy mallet, and sometimes a simple linen bag. Today you can recreate the sweat drenched flavor of this ice, at several times the price, with a Lewis bag. If you are considering this option you may first want to try a substantially cheaper linen dish towel and any variety of household hammer. Don’t do this at home while someone is trying to sleep.
  • Food Processor- Any good food processor can crush the hell out of some ice. The downside: all that slicing friction will also create a lot of water. Try straining before use.
  • Ice Crushing Appliance – It may seem like a lavish investment but it is less expensive than a half dozen Lewis bags.
  • Your Freezer- If you have a freezer with an automatic ice maker and a “crush” setting this is pretty obvious. If you do not have these things, then it may seem like a hefty investment for typically not-so-great crushed ice. This ice is good for quickly chilling a drink, but for serving the pieces are typically pretty inconsistent and will water down a drink more quickly than most people enjoy.
  • Sonic

How to Make Corn Tortillas

V GF
Fresh homemade corn tortillas

Fresh homemade corn tortillas

Ingredients

  • 2 cups masa harina
  • ½ teaspoon kosher salt
  • 1 teaspoon baking soda
  • ½ tablespoon vegetable oil
  • 1 ½ cups warm vegetable stock

Preparation

  1. In a medium bowl, combine masa, salt, and baking soda. Stir in oil and water. Knead until  a thick dough forms. Add additional masa harina or stock to adjust the consistency.
  2. Roll the dough into golf ball-sized balls and set aside.
  3. Heat a cast iron skillet on high heat.
  4. Start pressing and cooking tortillas. Press the dough between two sheets of wax paper in a tortilla press, or between two heavy, flat plates.
  5. Use a flat spatula to peel the flattened tortilla off the wax paper and place in the hot skillet. This is when it is handy to have a friend help with the cooking while you continue pressing.
  6. Cook the tortillas about 30 seconds to 1 minute on each side.
  7. Transfer to a plate and cover with a dish towel. Continue until all of the prepared masa is used.
  8. Use immediately in enchiladas, tacos, or as a side, or store in an airtight bag at room temperature. If the tortillas become stale before you can use them consider making chilaquiles or migas.


Pastry Cutter

Thank you, whoever you are.

We do not have a lot of appliances in our tiny kitchen, and in the absence of a stand-up mixer, our pastry cutter has become one of my favorite tools. It is great for mixing dough and is my favorite utensil for mashing homemade refried beans.

Pastry cutters are available in most stores that sell kitchen wares, and on Amazon they should run you around $10. Or you can do what we did and snag a good-as-new, heavy-duty pastry cutter at Goodwill that was discarded by either the family of someone who died or a person who just bought a stand-up mixer.


Refreshing Greens

Many Saturdays, by the time we get home from the farmer’s market our greens and leafy herbs have started to wilt. After spending a lot of time talking with the experts (JBG customers), here is our method for reviving and preserving our greens.

  1. Place the wilted greens in your clean kitchen sink and fill with cold water.  Reduce the temperature an additional few degrees by adding some ice cubes.
  2. Allow the greens to cool and absorb water for 15 to 20 minutes then allow them to dry on a dish towel or a clean dish rack for about 10 minutes.
  3. Place the greens in clean, dry plastic produce bag and refrigerate until you are ready to use them.

Refreshing Greens


Preserving Fresh Herbs

All fresh leafy herbs are a little different, but these tips should help you extend their life expectancy:

A delicious lineup of fresh herbs

Mint

All varieties of mint do well in water. Trim the ends of the mint and remove the leaves up to the water level in your desired container. With any luck the mint will sprout roots and and you will be able to enjoy fresh mint for weeks.

Parsley

Parsley is a hearty herb. If it wilts before you can get it home, refresh it by immersing in a bowl of ice cold water for about 15 minutes until the leaves are crisp again. Gently dry the parsley and store it in an air tight container in the refrigerator for up to two weeks (or maybe even longer!).

Cilantro

Cilantro is a very tender green. It may need to be refreshed like parsley, but should be allowed to hang while it dries. Wrap in a paper towel and store in an airtight bag.

Lemongrass

This is the easiest herb in the world to preserve indefinitely. Simply place fresh lemongrass stalks in a vase of water. Roots will form in a day or two and new shoots will star to appear in about a week. If you are not interested in propagating a lemongrass house plant, the stalks can also be peeled and frozen.

Basil

We have found basil to be the trickiest herb to preserve of all. Sometimes, after refreshing in ice water, we have been able to trim the stems and leave it in water for days. They have even sprouted roots and thrived! Then, other times, we will treat them the same way and they are wilted in the morning. The best plan is to use it as soon as you can, and if you need to use up extra basil you can always make pesto.


Freezing Green Beans

Green beans cut and blanched

Eating seasonally can mean that at certain times of the year you miss some of your favorite foods. We love green beans, but the season for them in Texas is short and doesn’t satisfy a year-round craving. My Grandmother used to can green beans, which I think are delicious but acid-free canning is for the brave and people who own pressure cookers. I am neither of those things so I embrace a much simpler approach– freezing!

Ingredients

  • 2 pounds of fresh green beans, washed, stemmed, and cut into 1/2 inch pieces
  • 1/2 gallon water
  • 1 tablespoon kosher salt

Tools

  • clean dish towel
  • 1 gallon heavy duty freezer bag

Preparation

  1. In a large stock pot, add the salt to the water and bring to boil.
  2. Once the water comes to a boil, add the green beans and blanch for 1 minute.
  3. Drain the beans in a colander and rinse with cool water to stop the cooking.
  4. Spread the dish towel on a clean, dry surface and spread the blanched beans out to dry.
  5. Allow the beans to dry for an hour or two then transfer to the freezer bag and place in the freezer.
  6. If the beans are dry they will not freeze together and you will be able to use them as needed in the winter months!


Green beans bagged and ready to freeze


How to Prepare Fresh Fava Beans

Fresh fava beans in their pods.

You might be able to find fresh fava beans at grocery stores specializing in imported Latin American, African, or Middle Eastern foods. If you are fortunate enough to get your hands on some you might need some help preparing them.

Fava beans in the pod.

First, remove the beans from the pods. Fresh pods are usually pretty soft and should be easy to rip open with your bare hands. There are typically three to five large beans in each pod.

Once you have removed the beans from the husks you still need to shell the fava beans. The easiest way to do this is to blanch the beans in boiling salted water for about one minute. Rapidly cool the beans under cold running water or in an ice bath. This will loosen the shells and allow you to easily peel them away from the beans.

Now you have a bowl full of fresh, delicious fava beans that are ready to use!


Slicing a Fresh Pineapple

The color of a ripe pineapple can vary by variety so the best rule of thumb is to pick one that has a good fragrant smell and that gives just a little to a very firm grip.

To slice a fresh pineapple remove the top with a long sharp knife and remove enough from the bottom to create a flat surface. Then, stand the decapitated pineapple up and slice the rest of the skin off in long even sections. This will result in an octagonal fruit. Finally, slice the pineapple into quarters and remove the core.  Slice as directed.


How to Cook Winter Squash

Cooked Butternut Squash

There are two good methods to use to cook hard winter squash variates like acorn squash, butternut squash, pumpkins, and kabocha. Incidentally, like soft skinned so called “summer squash”, winter squash also grows in the warmer months of the year but its skin gives it a longer shelf life so it is typically stored and eaten in the fall and winter. But, I digress.

The two methods I recommend are:

1. Peel the squash and with a sharp knife, carefully cut it in half, remove the seeds, and microwave the in a covered glass pie dish on high with about ½ and inch of water for 5-10 minutes, or until very soft. This works well when you are working with a small squash and feeling impatient.

2. Bake the squash halved, seeded, and unpeeled at 400°F for 20-30 minutes. Allow the squash to cool until it can be comfortably handled then scoop the baked pulp out of the skin with a spoon. This works well for larger squashes and, since the first method involves adding water, recipes that you don’t want to be excessively moist.


Next Page »


© Copyright 2012 Coseppi Kitchen and Coseppi Partnership (Taylor Cook and James Seppi). All Rights Reserved.