Coseppi Kitchen

Inclusive Vegetarian Cooking by Taylor Cook & James Seppi

Recipes

All Coseppi Kitchen recipes are vegetarian. We’ve also tagged recipes as “gluten-free” and “vegan” when applicable.


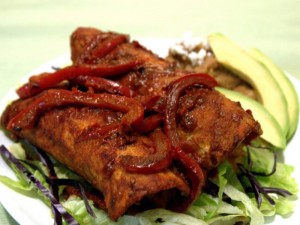
Enchiladas Mineras

GF

Enchiladas Mineras are a special Mexican dish originating in Guanajuato.  Mining was and is still a large part of the economy of the city and state of Guanajuato, and miners need hearty food to replenish themselves after a hard day’s work.  These enchiladas filled with potatoes and carrots and covered with a rich red sauce certainly fit the bill, though you don’t have to be a miner to enjoy them!

Enchiladas Mineras

Ingredients

  • 1 batch Red Enchilada Sauce
  • Corn tortillas
  • 1 cup crumbled queso fresco or shredded Monterrey jack cheese (optional)
  • 2 tablespoons vegetable oil
  • 1 medium white onion, diced
  • 3 garlic cloves, minced
  • 1 pound golden potatoes, cubed
  • 1/2 pound carrots, sliced
  • 4 cups vegetable stock
  • 2 bay leaves
  • 2 tablespoons fresh lime juice (about 1 Persian lime)
  • 1 teaspoon fresh ground cumin
  • 4-3 pickled jalapenos, sliced
  • salt to taste
  • 2 cups sliced cabbage or lettuce

Preparation

  1. Bring potatoes, carrots, stock, and bay leaves to a simmer in a large soup pot. Cook until the potatoes are just tender, about 10 to 15 minutes. Strain the vegetables, removing the bay leaves, and set aside.
  2. In a large skillet, heat the vegetable oil and saute the onions and garlic with cumin until fragrant and tender, about three minutes. Mix in the lime juice and season with salt to taste.
  3. Combine the potatoes and carrots with the sauteed onions and cheese.
  4. Pour the enchilada sauce in a shallow dish, like a pie pan. Prepare the enchiladas by coating the tortillas with sauce and then filling each with about 1/2 a cup of filling. Roll the filled enchiladas and place in a rectangular baking dish.
  5. When the dish is full, pour the remainder of the sauce over the enchiladas and bake at 350 degrees until the sauce begins to bubble, about 15 minutes.
  6. Remove the enchiladas from the oven and allow to cool for about five minutes.
  7. Serve the enchiladas over a bed of lettuce or shredded cabbage, and garnish with pickled jalapeno slices and cheese, if desired. Consider serving with fresh tomatillo salsa and refried black beans.
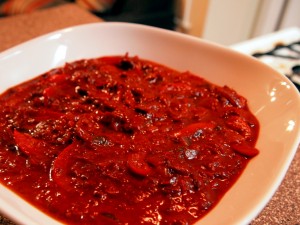
Red Sauce for Enchiladas

V GF

This red sauce is made mainly from dried Mexican guajillo chili peppers, which have an amazingly rich flavor, especially when fried a little.  Also, this sauce isn’t just for enchiladas – it also goes great as a dipping sauce for tortilla chips or as a table condiment for your next Mexican meal.

Red Sauce for Enchiladas

Red Sauce for Enchiladas

Ingredients

  • 8 large dried guajillo chilis
  • 2 dried chipotle peppers
  • 2 tablespoons vegetable oil
  • 3/4 cup vegetable broth
  • 1/2 large white onion, diced
  • 1 large red bell pepper, cut into thin strips
  • 2 cloves garlic, minced
  • 2 medium red tomatoes, diced (2-3 canned whole tomatoes can be substituted)
  • 1/2 tablespoon Mexican oregano

Preparation

  1. Boil dried guajillo and chipotle peppers in a pot of water until softened, about 10 minutes.
  2. Drain the water and, when the peppers are cool enough to handle, remove the steams.
    Tip: If you are making broth from Better-than-Bouillon or a cube, reserve some of the pepper water for the broth!
  3. Heat 2 tablespoons of oil in a large skillet. Fry the softened peppers for a minute on each side on high heat until fragrant. Remove from heat.  Leave the leftover oil in the skillet and remove the skillet from heat.
  4. Transfer peppers to a blender. Add the broth and puree until smooth.
  5. Reheat oil in the skillet and saute bell pepper, onion, garlic, tomatoes, and oregano until the peppers are soft, about 10 minutes. Add the pepper puree and continue cooking for another minute or two.  Season with salt to taste and serve!

Note: If desired, you can blend the sauce again for a completely smooth sauce, but I like it with the strips of pepper and diced onions.


Rum Balls

V GF

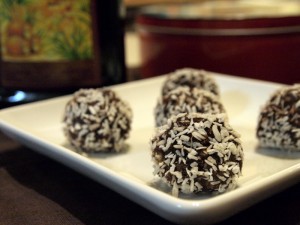
The first rum balls we ever had were made by friend we made while traveling in Peru who wanted something festive to contribute to our very international Thanksgiving feast. This version is both vegan and gluten-free, and is sure to be a hit at your next holiday gathering.

Rum Balls

Rum Balls

Ingredients

  • 1 cup almonds
  • 1 cup pecans
  • 1 cup walnuts
  • 1 cup dates
  • 4 tablespoons cocoa powder
  • 1/2 cup oats
  • 1/4 cup Jamaican rum
  • 1/4 cup powdered sugar
  • 1/2 cup unsweetened grated coconut

Preparation

  1. In a food processor, grind the nuts, dates, cocoa powder, and oats.
  2. Place the mixture in a bowl and add the rum to make a dough.
  3. Use your hands to roll the dough into small balls and then roll them in powdered sugar and coconut.

Vegan Rosettes

V

Rosettes are delicate Scandinavian fried cookies often prepared for the holidays.  They are typically made with a simple funnel cake-like batter that has eggs and milk, so we crafted this vegan version that tastes just as good and has the added benefit of making more well-defined rosettes.

To make rosettes you’ll need a special tool called a Rosette Iron. We used this Norpro Rosette Iron and found it to work quite well, though we’ve heard old-school cast iron ones work better than aluminum.

Vegan Rosettes

Vegan Rosettes

Ingredients

  • 2 tablespoons ground flax seed
  • 6 tablespoons of water
  • 1 1/2 cups of soy or almond milk
  • 1 tablespoon lemon juice
  • 1/2 cup all-purpose flour
  • 1/4 cup sugar
  • 1 teaspoon baking powder
  • 1/2 teaspoon ground fennel seed (optional)
  • 1 liter of vegetable oil
  • powdered sugar for dusting

Preparation

  1. Soak flax seeds in water for about 10 minutes. Combine in a blender with soy milk and lemon juice until smooth. Pour the liquid ingredients into a large bowl and set aside.
  2. Combine sugar and fennel seed (if using) together in a medium bowl. Stir in baking powder and flour.
  3. Whisk dry ingredients into the wet ingredients 1/2 cup at a time to make the batter.
  4. Cover and refrigerate for at least an hour. Move the batter to a heat-resistant, shallow dish (a bread loaf pan works well).
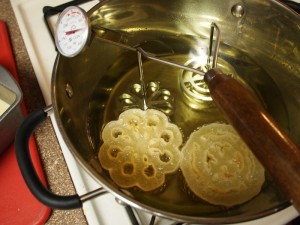
  5. To make the cookies, heat three to four inches of oil in a large stock pot to 350-360 degrees Fahrenheit — this is the ideal temperature range  for frying these, so we suggest using a candy thermometer to monitor and adjust the heat throughout the cookie making. Place the rosette molds into the oil while it heats.
  6. When the oil reaches 350 degrees remove the molds from the oil, taking a few seconds to allow excess oil to drip off, then place the hot molds in the batter, being careful not to let the batter come up over the molds. Quickly move the batter-covered molds to the hot oil.
  7. As the cookies fry, they will slip off the molds.  If they stick, you can carefully tap the handle of your mold on the side of the frying pot to enourage the cookies to drop off from the molds.
  8. Once the cookies are off the molds they will need need to be carefully turned with a pair of heat resistant tongs or chopsticks. Leave the iron in the hot oil while you are doing this so it maintains its temperature (see picture below)
  9. When the cookies have browned, use the tongs to remove them from the oil, carefully shaking off excess oil, then place them on a paper towel to cool.
  10. While they are still a bit warm, dust the warm cookies with powdered sugar or colored sugar crystals.
  11. Continue frying cookies until all the batter is used.
  12. Store completely dried cookies in an airtight container.

This recipe makes about two dozen delicious rosettes.

Frying Rosettes

Frying Rosettes


Hot Cocoa Mix

V GF

This is our vegan take on Imbibe’s Malted Hot Cocoa Mix. The mix has a higher cocoa to sugar ratio so it is more flavorful than almost anything you can get in the store. Since the cocoa is so prominent it is important to use a nice powder like Valrhona.

Hot Cocoa Mi

Hot Cocoa Mix

Ingredients

  • 2 cups powdered sugar
  • 1 cup unsweetened cocoa powder
  • 2 1/2 cups powdered soy milk
  • 2 tablespoons corn starch, tapioca flour, or potato starch
  • 1/4 teaspoon cayenne pepper (optional)
  • pinch of fine sea salt
  • pinch of cinnamon
  • pinch of nutmeg

Preparation

  1. Gently combine ingredients in a medium bowl with a fork or whisk.
  2. Sift the ingredients into a large bowl to thoroughly combine.  You can store this powder in airtight containers and give it as gifts to your friends and loved ones.
  3. To prepare the hot cocoa, combine 1/4 cup hot chocolate mix with 8 ounces of hot water.
  4. Top with your favorite gelatin-free marshmallows or, if you are Colombian, a slice of fresh cheese, or, if you are in the Christmas spirit, add a splash of whiskey or rum.

Oppan Veggie Style

V GF

Not long ago, we won Michael Natkin‘s cookbook Herbivoracious at an Austin Food Bloggers‘ event. The book starts with a great introduction to ingredients and equipment, and its collection of recipes includes many international dishes with tons of variations and side suggestions. James and I have really enjoyed reading it and tonight we finally got around to trying a couple dishes.

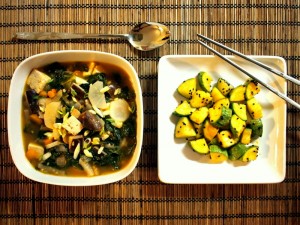
Kimchi Stew sans Kimchi with Spicy Stir-Fried Squash

It finally dipped below freezing in Austin last night so we decided to tackle Natkin’s Kimchi Stew with Shiitake and Daikon. Thanks to JBG and some luck, we had nearly all of the ingredients in the refrigerator except for the title Kimchi! James loves to make this all-important fermented Korean staple and, surprisingly, we were out. Even more surprisingly it does not appear kimchi is stocked at Central Market!

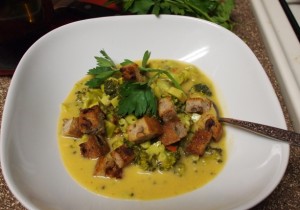
Working with what we had, we doubled down on the ginger and garlic and added a bunch of broccoli rabe  to to the soup to stand in for the kimchi. It turned out really well and I can only imagine how delicious the more authentic soup is. We paired the soup with a side of Natkin’s Spicy Stir-Fried Zucchini (or in our case, calabaza) and cold soba noodles. Even without the kimchi, I think Psy would have approved (maybe).

Here is James’s Variation:

Kimchi Stew with Shiitake and Daikon (sans Kimchi)

Ingredients

  • 2 tablespoons sesame oil
  • 2 cups daikon radish, sliced into thin half moons
  • 1/2 cup baby carrots, sliced into thin rounds
  • 5 or 6 shiitake mushrooms, stemmed and cut into chunks
  • 1/2 white onion, chopped
  • 1/2 large cayenne pepper (or other hot red pepper), diced
  • 4 large cloves garlic, grated
  • 1 tablespoon ginger, grated
  • 4 cups water
  • 3-4 tablespoons Sriracha (or to taste)
  • 1 teaspoon Better-than-Boullion paste
  • 4 tablespoons soy sauce (gluten-free if required)
  • 1 pound hard tofu, cut into 1/2-inch cubes
  • 1 bunch broccoli rabe, roughly chopped
  • salt to taste
  • diced spring onion for garnish

Preparation

  1. In a large pot, saute the daikon, carrots, and mushrooms in the sesame oil over high heat for about 2 minutes.
  2. Add onion, cayenne, garlic, and ginger and continue to saute until the onions are soft, 2-3 minutes more.
  3. Add the water, Sriracha, Better-than-Boullion, and soy sauce, and bring to a boil. Reduce heat and simmer for about 10 minutes.
  4. Add the tofu and broccoli rabe, bring back to boil, then reduce heat and simmer for 5 minutes more.  Season with salt to taste.
  5. Serve garnished with diced scallion.


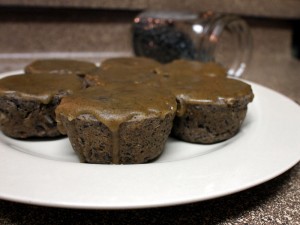
Black Bean Muffins

Black Bean Muffins

Sweetened bean dishes are unusual in Western cuisine but they are quite popular in Asia. We had some black bean pudding left over after making frejol colado and this little experiment is what happened. Turned out pretty well!

Ingredients

  • 2 cups cooked black beans
  • 1/2 cup almond milk
  • 1/4 cup vegetable oil
  • 1 tablespoon lemon juice
  • 1/4 teaspoon vanilla extract
  • 2 whole eggs
  • 1/2 cup raw sugar
  • 1/2 teaspoon salt
  • 1 teaspoon ground cloves
  • 2 teaspoons ground cinnamon
  • 1 cup flour
  • 1/2 cup shredded coconut

Preparation

  1. Combine beans, almond milk, vegetable oil, lemon juice, vanilla extract, and eggs in a blender. Blend until thoroughly combined and the beans have been pureed.
  2. Pour black bean mixture into a large bowl and stir in sugar, salt, salt, cloves, cinnamon, flour, and coconut.
  3. Scoop batter into muffin cups and bake at 350 degrees F for 30 minutes.
  4. If you’d like, top with an icing of your choice.  We made this simple icing, but flavored it with ground cloves: http://www.thekitchn.com/simple-solutions-how-to-make-a-94001

Grapefruit Blinker Marmalade

V GF

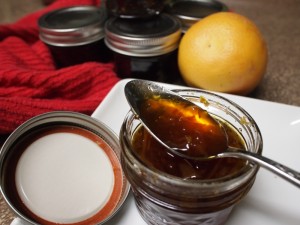
Grapefruit Blinker Marmalade

A Blinker is a classic cocktail made with 2 ounces rye, 1 ounce grapefruit juice, and a teaspoon of grenadine. This marmalade is inspired by the cocktail and everything else that tastes good with grapefruit.

Ingredients

  • 2 medium grapefruits
  • 1 medium orange
  • 1 lemon
  • 4 cups raw sugar, divided
  • 2 tablespoons chopped ginger
  • 1/2 teaspoon salt
  • 2 cups water
  • 4 ounces rye whiskey

Preparation

  1. Juice the grapefruits and orange. Finely chop the rinds and combine with the juice in a large non-reactive soup pot.
  2. Zest and juice the whole lemon. Add the lemon zest and juice, chopped ginger, salt, water, and two cups of sugar to the pot.
  3. Bring the mixture to a simmer, stirring frequently, and cook for 10 minutes.
  4. Remove the mixture from heat. Cover and let stand at room temperature overnight.
  5. Once the mixture has matured, add the remaining two cups of sugar and rye whiskey. Bring to a simmer over medium heat. Stir frequently to prevent the mixture from burning and continue to simmer until, using a candy thermometer, the mixture reaches  220 degrees Fahrenheit. If you have to increase the heat-level to reach the right temperature be sure to increase the frequency of your stirring as well.
  6. Remove from heat, and ladle into sterilized half-pint canning jars, leaving 1/4-inch head space. Wipe rims, seal jars and process in a boiling water bath for 10 minutes.
  7. Carefully remove the jars from the water bath and let cool for 24 hours. Test the seals then store in a cool, dark place until ready to use or serve.

Makes 4 half-pints


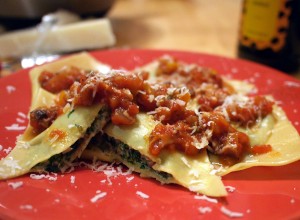
Broccoli Rabe Ravioli

Broccoli Rabe Ravioli

Over Thanksgiving I talked my mom into letting us bring home the hand-crank pasta machine that belonged to my grandfather.  I remember making fresh pasta with him as a child, my favorite type being ravioli.  My grandfather had a ravioli press, but unfortunately it was not in my mother’s possession.  As a first dish, I made these ravioli.  Beware – this is a time-consuming recipe, but the results are fantastic.  It is best done with friends and loved ones on a lazy Sunday afternoon.  Some wine or cocktails don’t hurt either!

Broccoli Rabe, also known as rapini, is a slightly bitter, slightly spicy green from the mustard family.  It is quite popular in southern Italy as well as in China.  Its somewhat strong flavor pairs well with the sweetness of ricotta to make these yummy ravioli.

Ingredients

  • 1/2 pound Basic Pasta Dough (prepared at least 30 minutes in advance)
  • 15 ounces ricotta cheese
  • 1/3 ounce dried porcini mushrooms, rehydrated in 1/2 cup boiling water
  • 1 tablespoon olive oil
  • 2 cloves garlic, minced
  • 1 bunch broccoli rabe (~3/4 pound), thick stalks removed
  • zest of half a lemon
  • salt and pepper to taste

Preparation

Filling

  1. First, place the ricotta into a cheesecloth-lined colander and let drain over a bowl in the refrigerator for several hours before you start preparing the rest of this recipe.  This will get the ricotta to a thicker consistency.
  2. Steam the broccoli rabe until tender, then squeeze lightly to remove excess water.  Let dry on a clean towel while waiting to use.
  3. Over medium heat, saute the rehydrated mushrooms in the olive oil.  Once they are fragrant and slightly fried (about 3 minutes), reduce heat to low and add the minced garlic.  Continue to saute until the garlic is lightly browned, about 2 more minutes.
  4. Remove the mushrooms and garlic from the pain, avoiding as much liquid or oil as possible.
  5. Finely chop the steamed, dry broccoli rabe.
  6. Combine the chopped broccoli rabe, drained ricotta cheese, fried garlic and mushrooms, and lemon zest in a large bowl.  Season with salt and pepper to taste.

Ravioli

  1. Divide the prepared dough into quarters.
  2. Run each of the dough portions through the pasta machine at the widest setting 2 or 3 times, then through each setting until the finest or second-finest setting.  Lay the sheets of dough on a lightly floured surface.
  3. Scoop out about 1 1/2 tablespoons of filling onto 1 sheet of dough at regularly-spaced intervals.  Lay a second sheet of dough on top of the first, and lightly press down around the scoops of filling to seal the dough.  Use a knife or scissors to cut ravioli from the dough. Place the ravioli on a lightly floured plate or other flat surface, but do not stack them on top of each other (they’ll stick!).
  4. Continue step 3 until you are out of filling. You can recombine the excess pieces of dough and make new sheets if you have excess filling.
  5. Cook the ravioli 3 or 4 at a time in a large pot of salted, boiling water.  They are done when they float, about 60 to 90 seconds.
  6. Serve with a sauce of your choice, such as our Garden Marinara, or just drizzled with a nice olive oil and some salt.

Makes 20-24 ravioli.

Elliott, James, and Clayton Making Ravioli


Broccoli Beer “Cheese” Soup

V

My allergies caught up with me today and I developed a slight cough and a sore throat. This rich, nutritious, and slightly spicy soup made me feel much better.

Broccoli Beer “Cheese” Soup soothes what ales you.

Ingredients

  • 2 teaspoons olive oil
  • 1/2 yellow onion, diced
  • 2 cloves garlic, minced
  • 1-2 fresh hot peppers, diced (optional)
  • 1 1/2 cups vegetable broth
  • 1 ounce American style lager
  • 1 tablespoon lemon juice
  • 1 teaspoon sugar
  • 1 pound broccoli, chopped
  • 1/4 cup nutritional yeast
  • 1/4 cup rice flour

Preparation

  1. Heat the olive oil in a large skillet and saute the onion, garlic, and hot pepper over medium heat until the onions are soft, about 2 minutes.
  2. Add the beer, broth, lemon juice, sugar, and broccoli and bring to a boil. Continue to cook until the broccoli is tender, about four minutes.
  3. Stir in nutritional yeast and rice flour and simmer to thicken, about one minute.
  4. Serve with the garnish of your choice.

« Previous PageNext Page »


© Copyright 2012 Coseppi Kitchen and Coseppi Partnership (Taylor Cook and James Seppi). All Rights Reserved.