Coseppi Kitchen

Inclusive Vegetarian Cooking by Taylor Cook & James Seppi

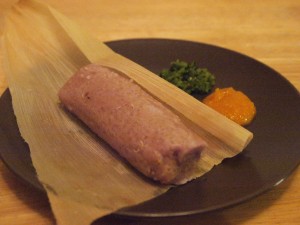
Magic Purple Quinoa Tamales

V GF

Tamales are popular from the tip of Chile up to the American Southwest. Peru is part of this tamale zone and has several varieties of these steamed savory corn treats. We have created a delicious traditional tamale recipe for The Authentic Peruvian Vegetarian Cookbook but last night we decided to have a bit of fun. While in Lima we stumbled across a small natural food restaurant serving large steamed corn tamales that included quinoa and coca powder in the masa (corn based dough). We wanted to recreate these healthful and colorful tamales, but as coca flour is unattainable in the United States we used a fortified broth to add some fun color to the dish.

If this is your first time to make tamales you might find the process a bit time consuming and tedious. However, once you have the techniques down and understand the process it can be fun and the results are rewarding. We have some steps and photos that might be helpful on our Tips and Techniques page. There are also many helpful videos online that you may want to study before starting.

Magic Purple Quinoa Tamales

Ingredients

  • 1 cup quinoa
  • 1 small head of purple cabbage, shredded
  • 3 cups vegetable stock
  • 2 cups masa harina 
  • 3 tablespoons of vegetable oil, divided
  • 1 teaspoon of garlic salt
  • 1 yellow onion, chopped
  • 1 bunch flat leaf parsley, chopped
  • 1 cup  kalamata or Peruvian olives
  • Salt and pepper to taste

Preparation

  1. Place 20-25 corn husks in a large bowl and cover with warm water to soften while you prepare the masa and filling.
  2. Prepare the quinoa according to directions.
  3. In a small pot combine  cabbage, vegetable bouillon, and water. Bring to a boil and cook for 20-30 minutes. Retaining the water, drain the cabbage and discard. Set aside.
  4. To prepare the filling, Heat 1 tablespoon vegetable oil in a large skillet, Add the onions and cook on low heat until thoroughly browned, about 10 minutes. Add the parsley and olive and cook for an additional 2-3 minutes on low heat. Set aside.
  5. To prepare the masa, combine cooked quinoa, reserved cabbage fortified broth, masa harina, vegetable oil, and garlic salt. Work the ingredients with your hands to create a thick  spreadable dough. If it is sticky add more masa harina until the desired consistency is achieved.
  6. Now you are ready to roll the tamales. Pat dry a softened corn husk and evenly spread about 1/4 cup of prepared masa evenly spread it over an area of the corn husk in an area roughly 3 x5 inches. Place 1 tablespoon of filling along the center of the tamale leaving a 1 inch margin on each end. Roll the tamale making sure that the masa has completely encased the filling.
  7. In a single layer, steam the tamales in the bottom of a large steamer. It may take up to 20 minutes to thoroughly steam a batch of tamales and you may have to add water a few times to make sure that the pot does not go dry. *TIP: I like to place a penny in the bottom of the pot- as the water gets lower you can hear the rattling increase.*
  8. Serve the tamales with your favorite aji.

Note: I recommend making a very large batch of tamales and freezing the leftovers in airtight plastic bags. A minute in the microwave will reconstitute a frozen tamale – they survive this process better than any other single type of food I know of.
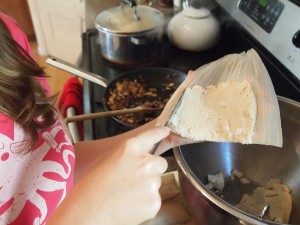
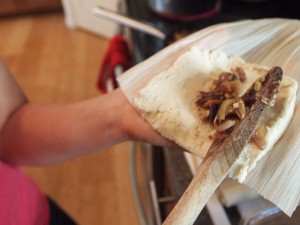
How to wrap a tamale

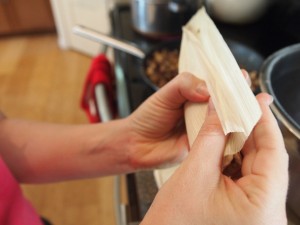
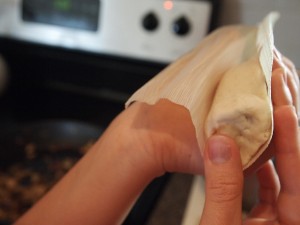
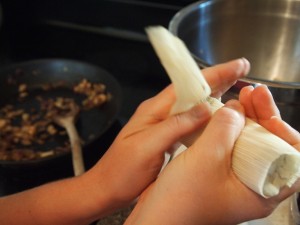
Wrapping tamales can potentially be a tedious process, but we hope that these photos will help you know that you are on the right track:

Spread the masa evenly across the bottom of corn husk in a 3 inch x 5 inch square

Add a tablespoon or two of the prepared filling to the center of the tamale

Roll the tamale by pressing the edges of the masa together.

Tap masa closed at the end of the tamale to further encase the filling.

You will notice that along the length of the tamale there is a seam and at the end you have a tail. Fold the tail to meet the seam and gently pinch the masa to make sure that the bottom is closed. When you lay the tamale down lay it tail down to keep the tamale closed.


Vegetarian Arroz Chaufa (Fried Rice)

V GF

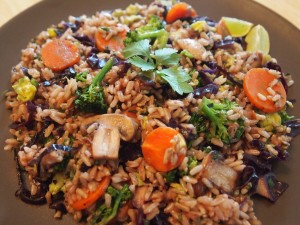
Arroz Chaufa is a Peruvian take on Chinese fried rice and is probably one of the most popular dishes in all of Peru. This vegetarian version uses brown rice, seasonal vegetables, and Peruvian herbs to create an authentic and healthful meal.

Vegetarian Arroz Chaufa

Ingredients

  • 1 1/2 cups long grain brown rice
  • 2  tablespoon vegetable oil, divided
  • 1/2 tablespoon sesame oil
  • 1 teaspoon ginger, minced
  • 1 teaspoon garlic, minced
  • 2 tablespoons gluten-free soy sauce
  • 1 cup broccoli, chopped
  • 1 cup purple cabbage, shredded
  • 2 carrots, chopped
  • 1 cup mushroom, sliced
  • 1 egg, beaten (optional)
  • 1/4 cup spring onions, sliced
  • 1/4 cup parsley, chopped
  • 1/4 cup cilantro, chopped
  • 1/4 cup mint, chopped

Preparation

  1. Prepare the rice in a rice cooker or on the stove top as directed.
  2. Optional: Whisk the egg vigorously and scramble in a large frying pan or wok with 1 tablespoon of vegetable oil. When the egg is thoroughly cooked remove from the pan and set aside.
  3. Add the remaining vegetable oil and sesame oil to the hot pan. Saute the ginger, garlic, green onions, and mushrooms until the spices are softened and aromatic and the mushrooms have expelled their liquid, about 3 minutes.
  4. Add the vegetables and saute until the broccoli is bright green and tender, about 3 minutes.
  5. Add the cooked rice, soy sauce, and herbs until well heated.
  6. Optional: Stir in cooked eggs.
  7. Serve hot with your favorite ají (try our Chifa Style Ají).

Chifa Style Ají

V GF

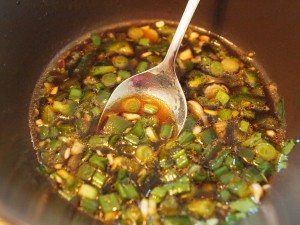
Chifas, what Peruvians call Chinese restaurants, often have a bowl of this quickly prepared style of ají sitting at every table.

Chifa Style Ají

Serve this with our version of Arroz Chaufa.

Ingredients

  • 2 tablespoons gluten-free soy sauce
  • 1 teaspoon sesame oil
  • 1 large jalapeno, seeded and diced
  • 1 clove garlic, minced
  • 1 green onion, sliced thinly
  • 1 tablespoon cilantro
  • 2 limes, juiced
  • 1/4 cup warm water

Preparation

  1. Combine all of the ingredients in a small bowl.
  2. Allow to marinate for at least 10 minutes prior to serving.

A Very Veggie South by Southwest: The 5th and Final Part

The entire City of Austin observes an annual collective hangover the last Sunday of SXSW. Post-party smells waft down 6th Street and off in the distance one or two lonely bands can be heard playing for a few remaining bleary-eyed, stumbling revelers. However, it is still technically SXSW, the weekend, and, for  those associated with The University of Texas, this Sunday is the last day of Spring Break. All of these factors require commemoration and we have found that the best way to celebrate while still respecting the malaise of the day is an afternoon BBQ.

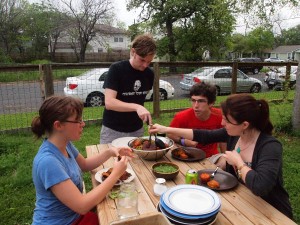
Enjoying some Pachamanca

James and I wanted to use the occasion to try out our ideas for a vegetarian Pachamanca, meaning “earthen pot” in Quechua. Traditional Pachamanca in the central Andes is accomplished by lining a large hole with searing hot rocks and then cooking several whole animals over the course of a few hours. Our variation, which is included in The Authentic Peruvian Vegetarian Cookbook, focuses on the vegetables that traditionally accompany a Pachamanca — including corn, potatoes, sweet potatoes, and beans — replaces the meats with mushrooms and tofu marinated in traditional Peruvian sauces, then grilled on a conventional appliance. It was a delicious and healthful way to wrap up SXSW.

Spencer and Elliott Gall, along with their parents Rob and Lynn, contributed to the cookout with the famous Gall Grilled Beet and Brussels Pizza that used broiled sweet golden beets and sauteed beet greens.

Spencer and Elliott Gall creating their signature grilled pizza.


Gall Grilled Beet and Brussels Pizza

This time of year in Texas the beets are massive and abundant and Brussels sprouts are still available in farmers markets.  This recipe is ideal for taking advantage of seasonal produce and the fantastic spring weather. This recipe was prepared for us by Elliott and Spencer Gall – Thanks!

Ingredients

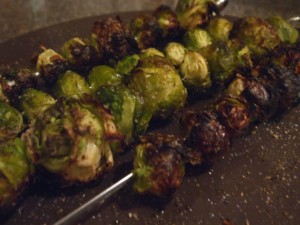
Sprouts, hot off the grill.

  • 1 cup Brussels sprouts
  • 1/4 cup olive oil, divided
  • 2 medium golden beets with greens
  • 2 cloves garlic, minced
  • 1/4 teaspoon salt
  • 1 portion pizza dough
  • 1/2 cup pizza sauce
  • 1/2 cup mozzarella, grated

Preparation

Toppings 

  1. Wash, halve, and skewer Brussels sprouts. Brush lightly with olive oil and sprinkle with salt and pepper. Grill on medium heat, about 350 degrees Fahrenheit, until slightly browned and tender. Carefully remove from grill and skewers and coarsely chop. Set aside.
  2. Thoroughly wash the beets and their greens.  With a sharp knife, remove the greens and set aside. Wrap the whole beets in tin foil and broil on high, about 500 degrees Fahrenheit, in the oven for 20-30 minutes or until tender.
  3. While the beets are cooking coarsely chop the greens and saute in 1 tablespoon olive oil with garlic and salt until wilted. Remove from heat and set aside.
  4. When the beets are tender, carefully remove from the oven, unwrap, and submerge in cold water. Allow the beets to cool for about 5 minutes then gently remove the skin with your fingers.  Transfer the broiled, peeled beets to a cutting board and slice into 1/8 inch thick rounds. Set aside.
Grilling Your Pizza
  1. Prepare your dough by stretching it out on a clean flat surface until it is about 12 inches around with a uniform thickness. Liberally brush the top of the dough with olive oil.
  2. Transfer the dough, oiled side down, to a medium heat grill. Grill for 45-60 seconds or until the underside of the dough stiffens and grill marks appear. Using a heat resistant brush, liberally apply olive oil to the uncooked side of the dough then, using tongs, flip the dough. Grill for another 45-60 seconds or until the second side of the dough is stiff and grill marks appear.
  3. Remove the pizza crust from the grill and build your pizza by spreading out a layer of sauce, adding a layer of beet slices, covering with beet greens and Brussels sprouts, and topping it all off with grated mozzarella.
  4. Return the pizza to the hot grill and cook, rotating occasionally to prevent burning, until the cheese melts, 5-10 minutes depending on how much time the grill lid is closed.
  5. Remove from the grill, slice, and server immediately with your favorite pizza accouterments.

Elliott slicing a Gall Grilled Beet and Brussels Pizza


A Very Veggie South By Southwest: Part 4

The last Saturday of SXSW is the ultimate date in Austin’s party calendar.  James and I attended the festivities after a morning volunteering at the downtown farmer’s market. As a result of our volunteering we were well equipped with several fresh local vegetables which inspired the following photos we dubbed “Bands with Fennel”.

The lovely Casey Desmond and Taylor Barefoot

Jess Collins of Mellow Bravo

Keith Pierce of Mellow Bravo

We also had the opportunity to discuss local agriculture and the value of fresh produce with our fellow concert goers. This lead to the timely and delicious end of our produce stash as “Bands with Fennel” became “Fans Eat Fennel”.

Viva fennel.


A Very Veggie South by Southwest: Part 2

First Annual Very Veggie SXSW Thursday Brunch.

With long lines, blazing sunshine, and long walks between venues, SXSW can be physically grueling. That is why it is important to start the day right with a healthy, well-rounded breakfast.  This morning we hosted a small brunch that featured locally available seasonal ingredients from Johnson’s Backyard Garden, the largest organic community supported agriculture farm in Texas. James and I are proud Johnson’s volunteers, and this time of year our refrigerator is flush with greens and root vegetables. With this inspiration we decided to serve a Peruvian style Sweet Potato and Kale Tortilla along with Spiced Carrot Bread.

To me, there is no better way to start the day than to have a nice hot cup of coffee, but SXSW demands nutrient dense foods in addition to caffeine. We opted to compliment our meal with a classic salty dog, a cocktail that make use of our wonderful seasonal Ruby Red Texas grapefruits and Tito’s Handmade Vodka, another celebrated Austin brand.


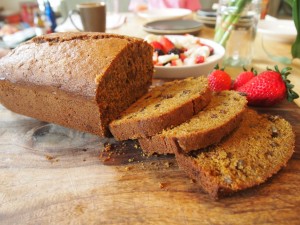
Spiced Carrot Bread

Spiced Carrot Bread

Spring in Austin can mean unpredictable weather: one day it is a sunny margarita-sipping kind of town and the next day you could be bundled up in a sweater hiding inside from a frigid downpour.  Spiced Carrot Bread makes use of carrots, which are locally available all spring, to create a nutritious and hearty breakfast bread that will give you the energy to brave chilly, wet spring downpours.

Ingredients

  • 1 cup packed dark brown sugar
  • 3 eggs
  • 1/2 teaspoon vanilla extract
  • 3/4 cup vegetable oil
  • 2 cups whole wheat flour
  • 1 teaspoons baking powder
  • 1 teaspoon baking soda
  • 1 teaspoon salt
  • 1 teaspoon fresh grated ginger
  • 1 teaspoon ground cinnamon
  • 1 1/2 cups grated carrots
  • 1/2 cup pecans, chopped
  • 1/2 cup raisins, plumped

Preparation

  1. Beat sugar, eggs, vanilla, and oil in a large bowl.
  2. Sift flour, baking powder, baking soda, and salt together in a medium bowl.
  3. Gradually add the dry ingredients to the wet ingredients and combine thoroughly.
  4. Add ginger, cinnamon, carrots, pecans, and raisins into the batter.
  5. Pour batter into prepared pan.
  6. Pour the batter into a greased loaf pan and place it in a preheated oven. Bake at 350 degrees Fahrenheit for 60 minutes.
  7. Allow to cool for about 30 minutes before slicing and serving.

Salty Dog Cocktail

V GF

A fresh spring salty dog.

A Salty Dog is the perfect Texas spring cocktail. Fresh ruby red Texas grapefruits pair perfectly with chilled vodka and a pinch of salt.

Ingredients

  • 2 oz. vodka
  • 6 oz. Carrot Grapefruit Juice
  • 1/4 cup of ice

Preparation

  1. Combine ingredients in shaker.
  2. Shake, strain, and serve in a salted glass over ice.
  3. Repeat as necessary.


« Previous PageNext Page »


© Copyright 2012 Coseppi Kitchen and Coseppi Partnership (Taylor Cook and James Seppi). All Rights Reserved.